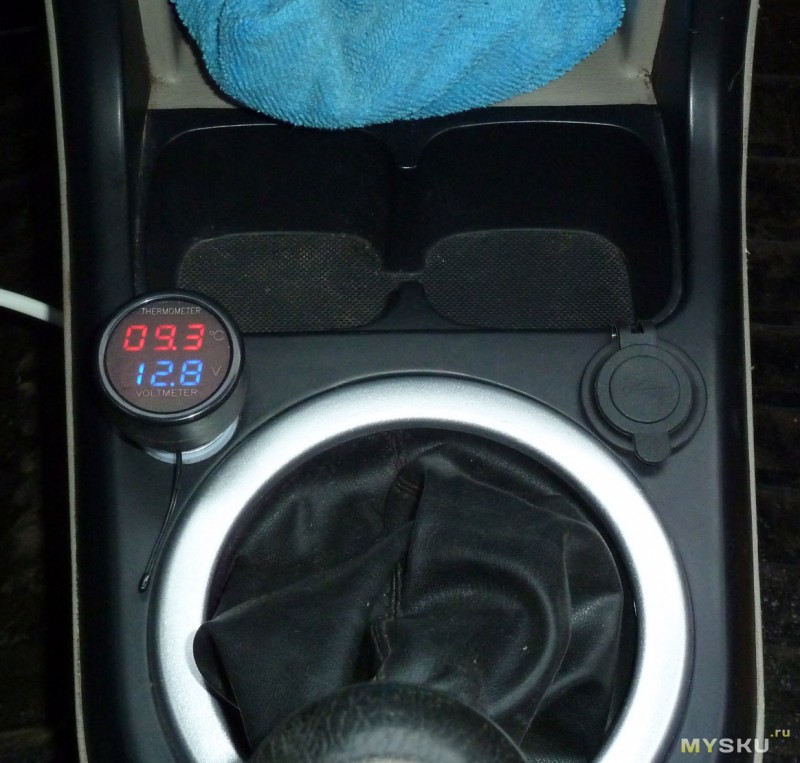
Эта зарядка примечательна тем, что не вставляется в гнездо прикуривателя, а устанавливается вместо него либо врезается в панель. Покупая автозарядку не за 1$ (как в прошлый раз), рассчитываешь получить что-то более-менее нормальное — буду её подробно изучать…

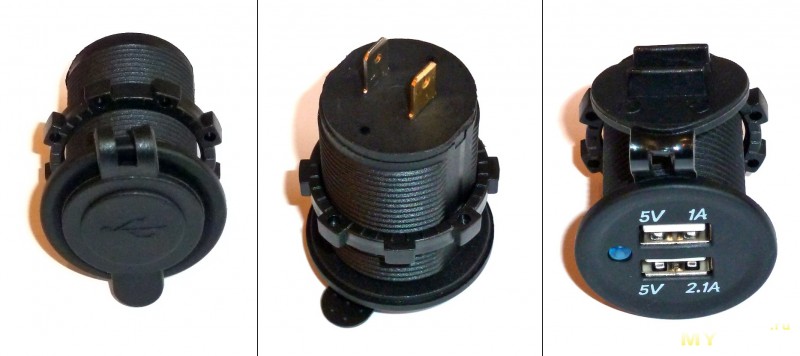
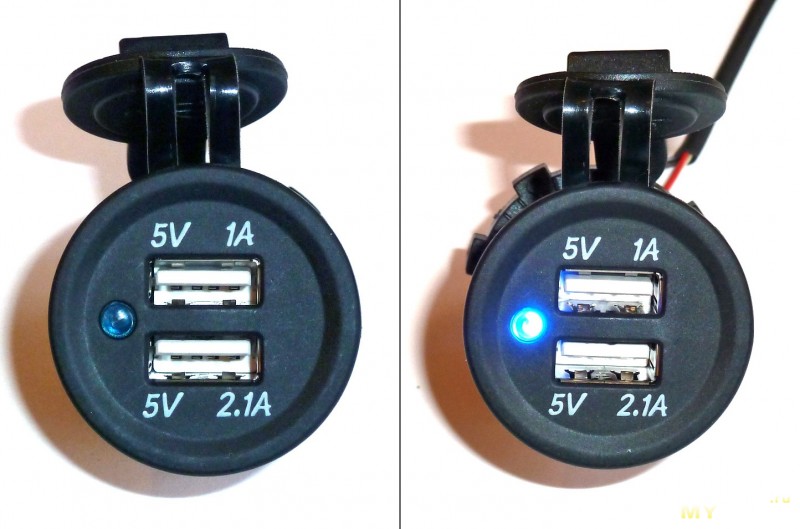
Резиновая заглушка закрывает не только USB гнёзда, но и синий светодиод, что скорее плюс.
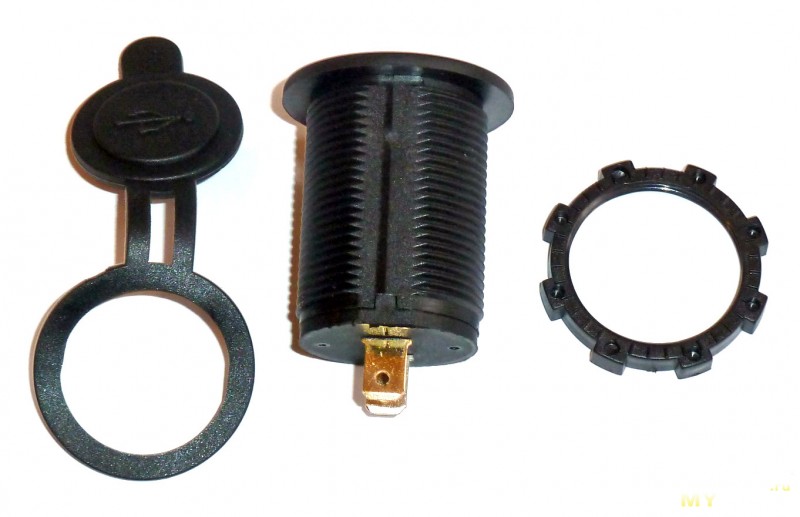
Установочное отверстие 29мм, глубина установки с клеммами подключения 65мм
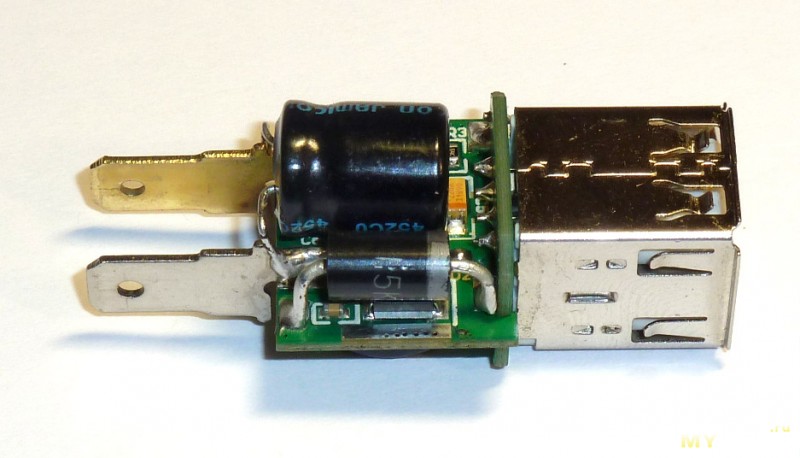
Прежде, чем зарядку нагружать, было решено в начале её разобрать, чтобы иметь представление об установленных компонентах и не спалить её преждевременно.
Разбирается зарядка без глобальных разрушений — сзади донышко слегка проклеено и скальпелем снимается.

Светодиод неожиданно оказался прямоугольным.
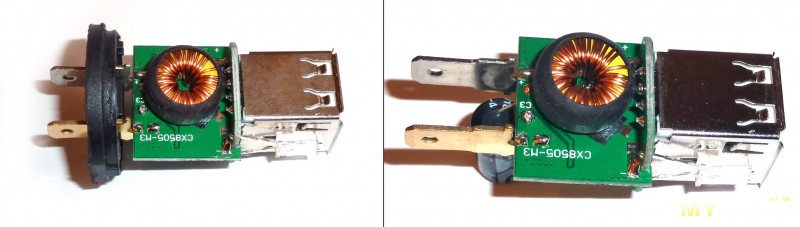
Традиционно срисовал схему зарядки.
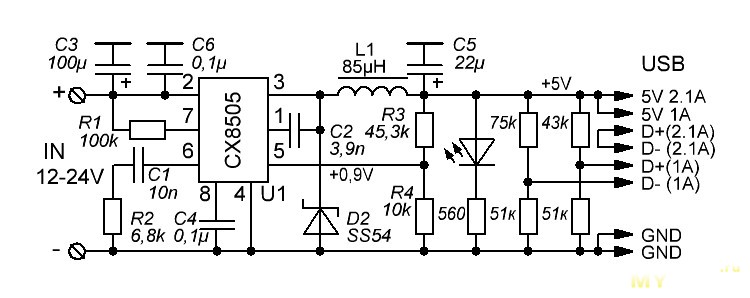
Собрана зарядка на базе CX8505 (Step-Down 30V 3A 350kHz Up to 95%)
Примечательно, что преобразователь синхронный.
img.jdzj.com/UserDocument/2012Y/yyh0916/Document/20121027111151.pdf
Рабочая частота преобразователя действительно 350кГц
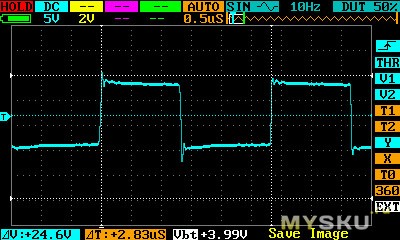
Амплитуда пульсаций на выходе при нагрузке 2А всего 40мВ
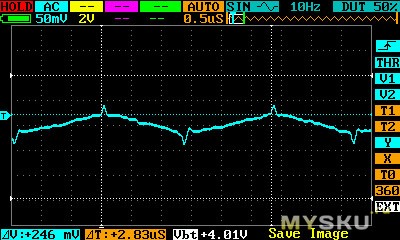
На выходе установлен танталовый конденсатор 22мкФ 10В (измерено 19мкФ 0,7Ом) — в данном случае это вполне оправдано, т.к. рабочая частота высокая (350кГц), а действующий рабочий ток конденсатора относительно небольшой (менее 0,1А) за счёт большой индуктивности дросселя.
Некоторые особенности применения танталовых конденсаторов можно почитать тут
www.compel.ru/lib/articles/tantalovyie-kondensatoryi-osobennosti-primeneniya
Теперь подробнее о проблемах…
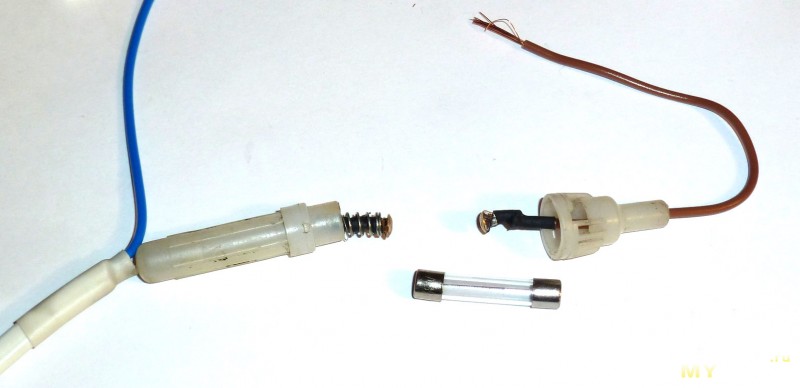
Встроенного предохранителя нет — придётся ставить внешний 1,6-2А на проводах подключения.
Отсутствует защитный стабилитрон (супрессор) на выходе, т.е. при пробое микросхемы, полное бортовое напряжение пойдёт на USB
Отсутствуют какие-либо фильтры — не исключено возникновение помех. Желательно поставить фильтр по входному питанию.
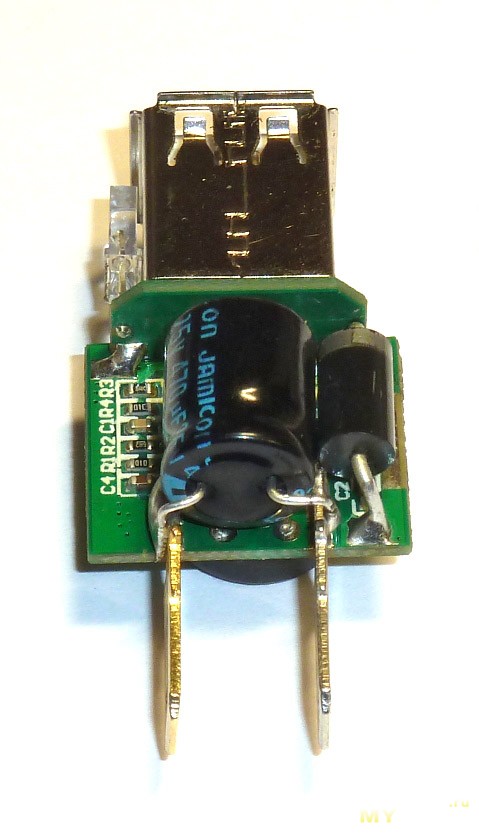
Входной конденсатор HUAHONG CD110 100мкФ 50В (измерено 90мкФ 0,6Ом) работает с перегрузкой по току.
В соответствии со спецификацией, для него допустим действующий рабочий ток всего 210мА, а реально при нагрузке 2A, через него течёт действующий ток свыше 1А, при этом он естественно сильно разогревается.
www.ecom.cz/open_sheet/sheet_name=D42738
Производителю надо было туда ставить нормальный LowESR конденсатор 330мкФ 35В.
Дроссель 85мкГн намотан на сердечнике D10.2/5.08/3.96 (-26) проводом 0,6мм 46 витков, который на таких высоких частотах работает неэффективно, поэтому производителю пришлось сильно увеличивать индуктивность для уменьшения нагрева сердечника. Оптимально было-бы использовать кольцо из высокочастотного материала (например -52).
Емкости конденсаторов C1 и C2 почему-то перепутаны местами (по сравнению с официальной спецификацией).
Проверка
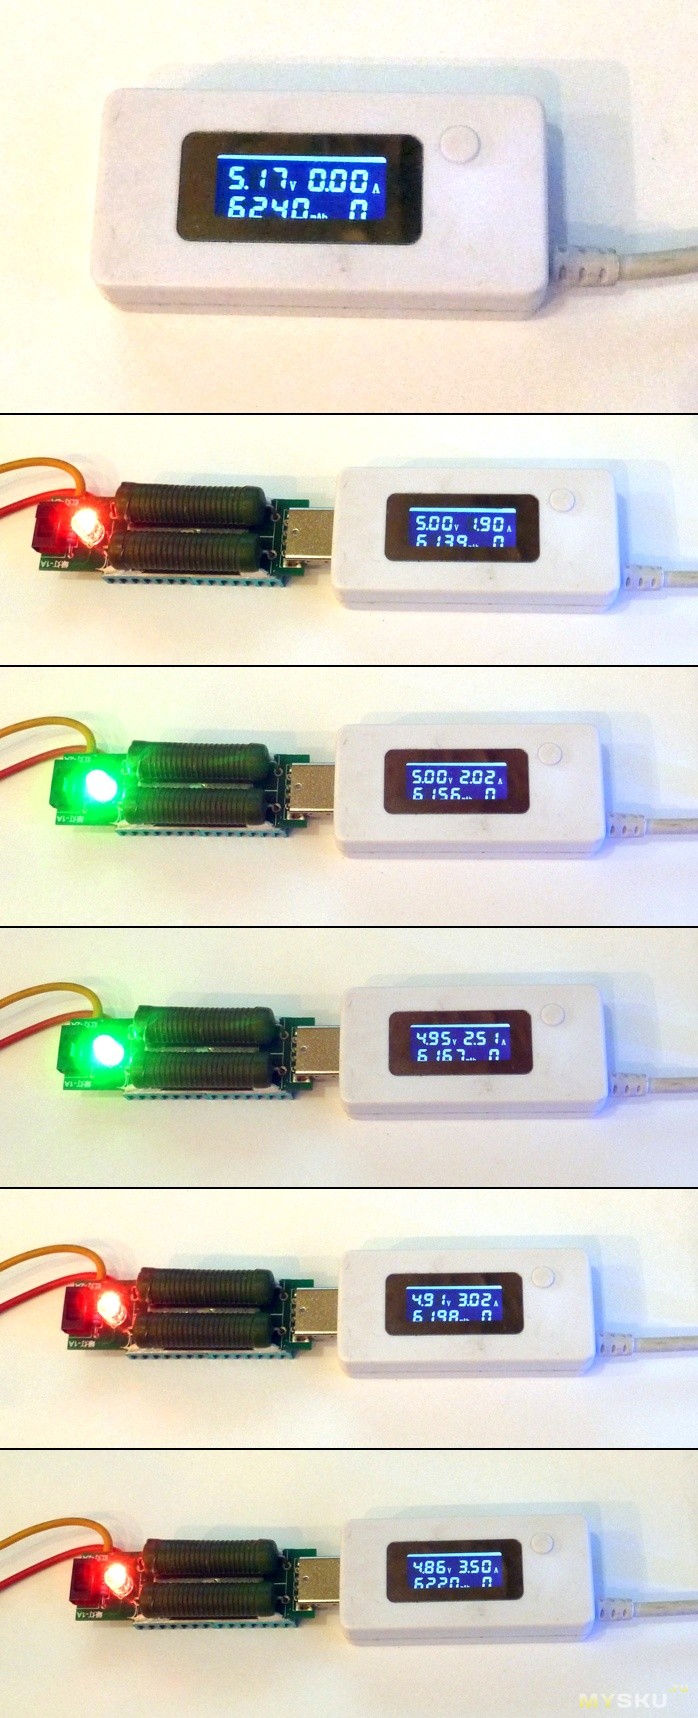
Ток холостого хода на входе 7мА
Напряжение холостого хода на выходе 5,23В (по USB тестеру 5,17В)
Проверка нагрева в открытом виде при температуре окружающего воздуха 22°С
— Ток 2А, дроссель 71°С, конденсатор 62°С, микросхема 65°С (реально ещё выше, т.к. корпус мелкий).
В закрытом виде нагрев элементов существенно возрастёт, но работать должно нормально.
— Ток 2,5А, дроссель 89°С, конденсатор 75°С, микросхема 80°С
В закрытом виде будет перегрев элементов и зарядка длительно не выдержит такую работу.
— Ток 3А температуры перевалили за сотню и тестирование было прекращено.
— Ток 3,5А очень кратковременно без измерения температур
— Ещё больший ток не тянет — на 3,6А срабатывает токоограничение и напряжение сразу проваливается.
— Выходной ток КЗ — 5,2А (кратковременно)
Проверка нагрева корпуса в закрытом виде при температуре окружающего воздуха 22°С
— Ток 2,1А максимальная температура корпуса 48°С
— Ток 2,5А максимальная температура корпуса 59°С
Замер КПД, напряжения фиксировались непосредственно на контактах запядки

Попытка поднять КПД преобразователя до заявленных 95% заменой дросселя и входного конденсатора успехом не увенчалась — эффективность заметно возрастала только на токах свыше 2А, что не имеет смысла в зарядке на 2,1А.
В итоге, заменил только входной конденсатор на 470мкФ 25В (для снижения его нагрева), поставил супрессор 1.5KE6.8 на выход и закрепил детали герметиком.

Теперь подробнее о подключении
Один из помощников
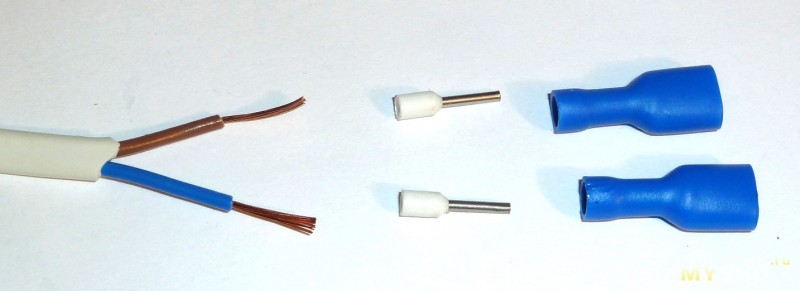
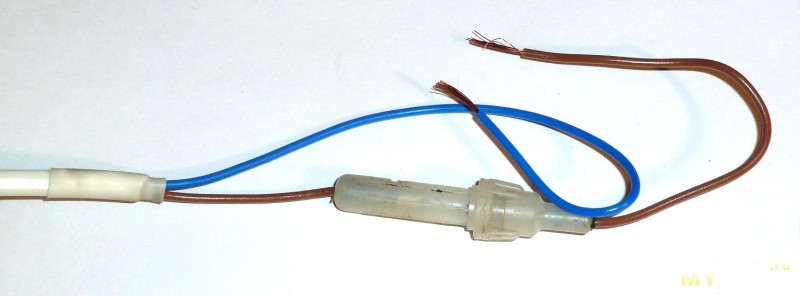
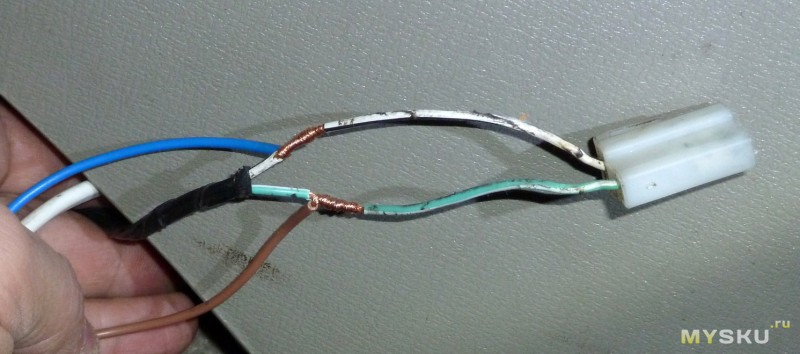
В комплекте идут клеммы под провод 2,5кв мм (синие). Это слишком толстый провод для такой зарядки — с большим запасом хватит 0,75кв мм
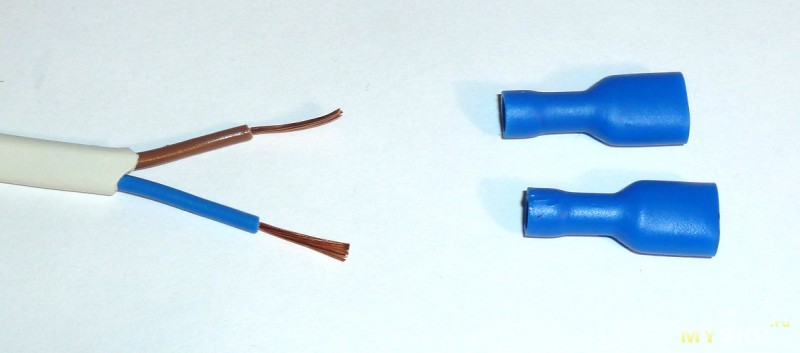
Просто так взять и зажать этот провод в клеммы — нельзя, т.к. они просто не будут держаться.
Но есть одна хитрость — использовать дополнительно штыревые наконечники нужного размера (в данном случае 0,75)
Провод обжал сначала ими
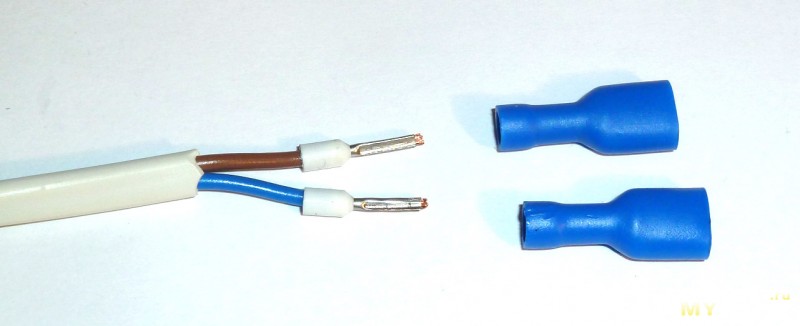
Затем их зажал в клеммы

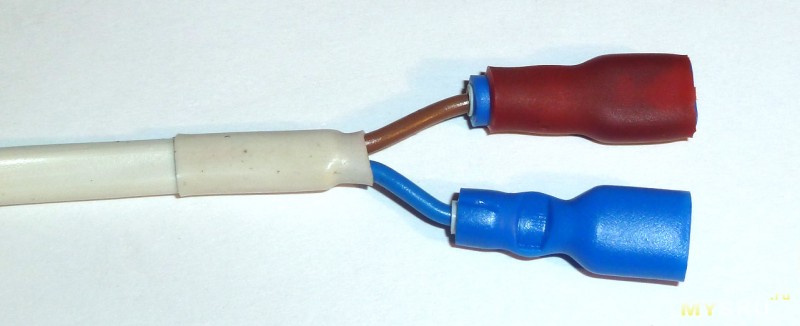
Для указания полярности, дополнительно надел красную термоусадку на плюсовой провод
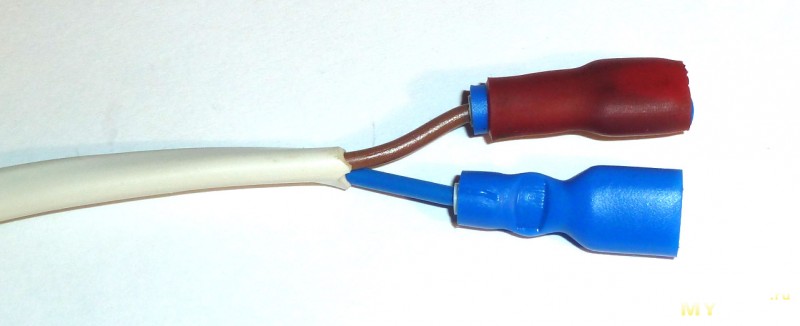
И закрепил изоляцию
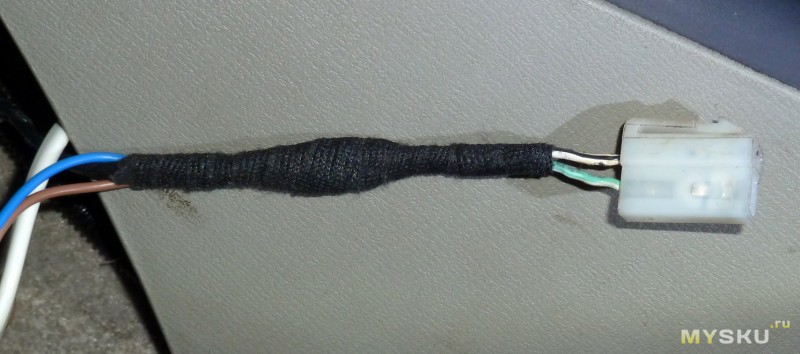
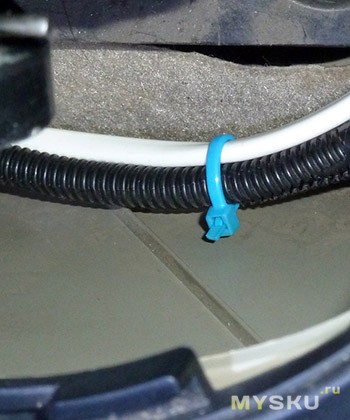
Надел ферритовый фильтр помех
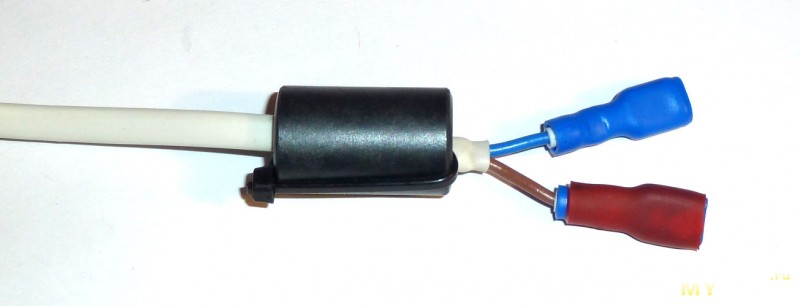
В сборе
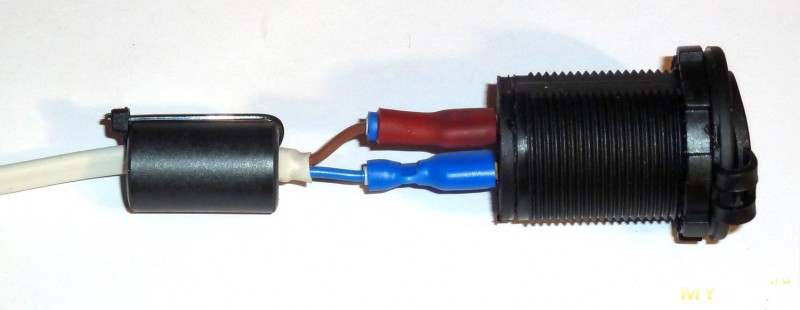
Или так
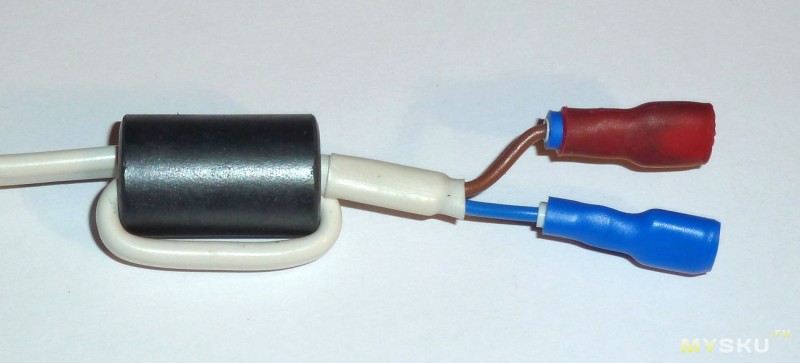
Чтобы феррит не бился о панели, обмотал его мягкой лентой для жгутования
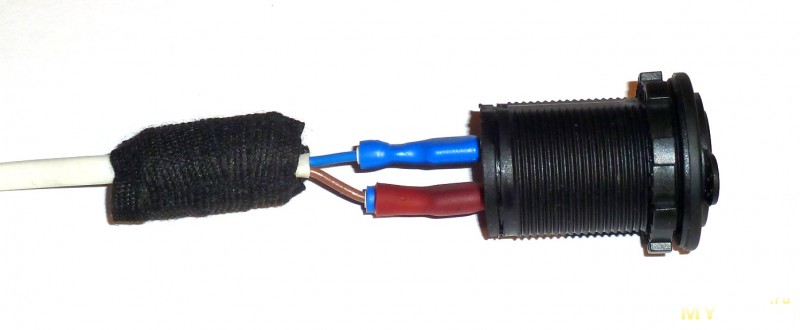
С другого конца добавил держатель предохранителя
Теперь можно ставить в авто вместо гнезда прикуривателя либо вырезать новое установочное отверстие.
Себе делал так…
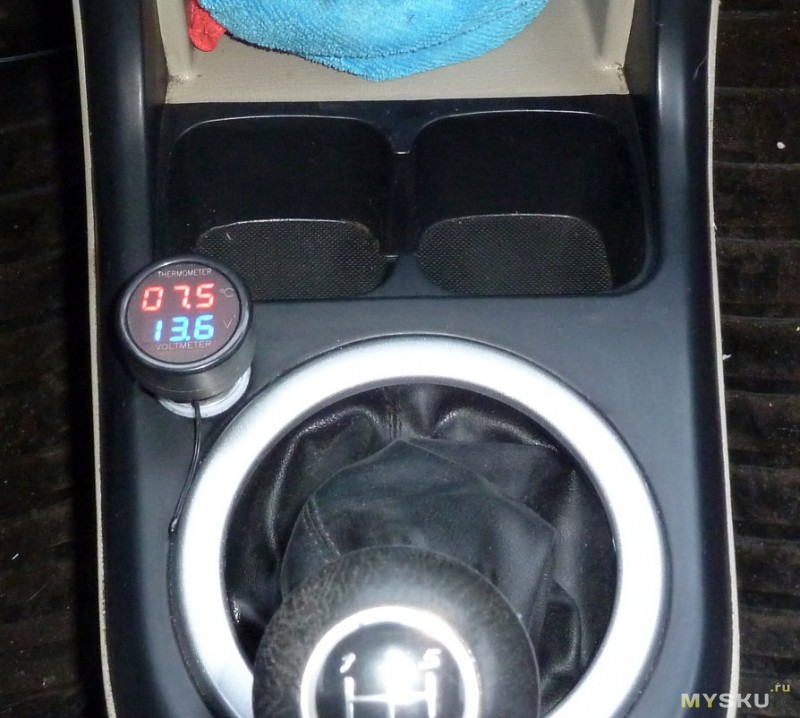
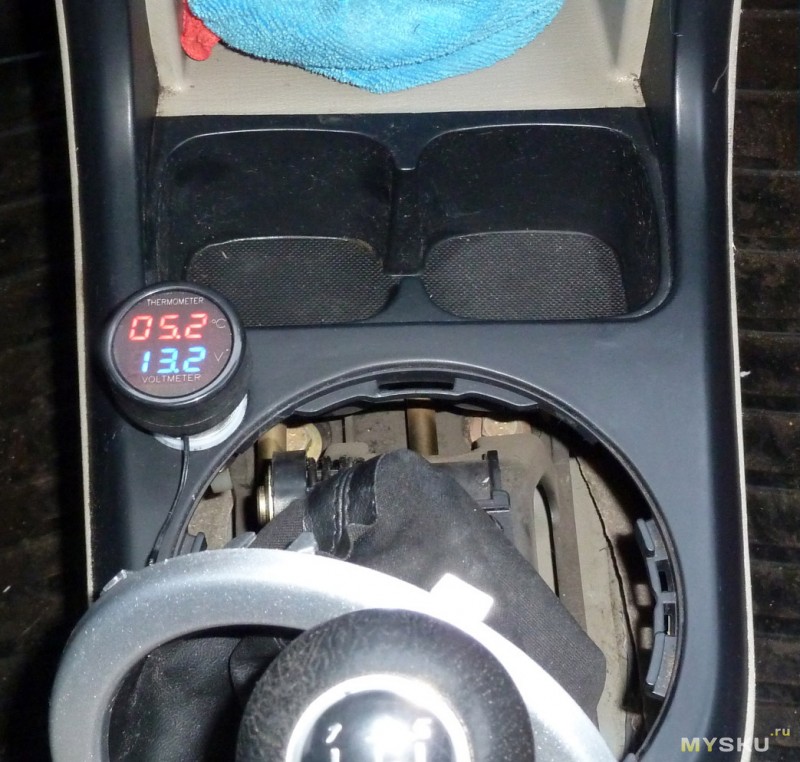
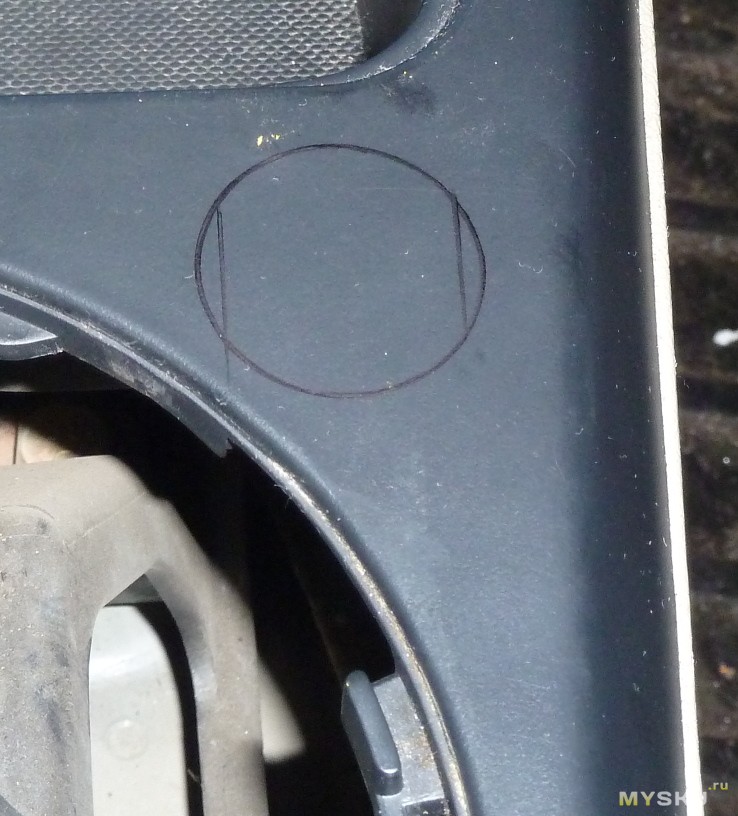
Выбрал место под установку
Снял защитный чехол ручки КПП
Разметил место при помощи снятой гайки и маркера
Высверлил по контуру
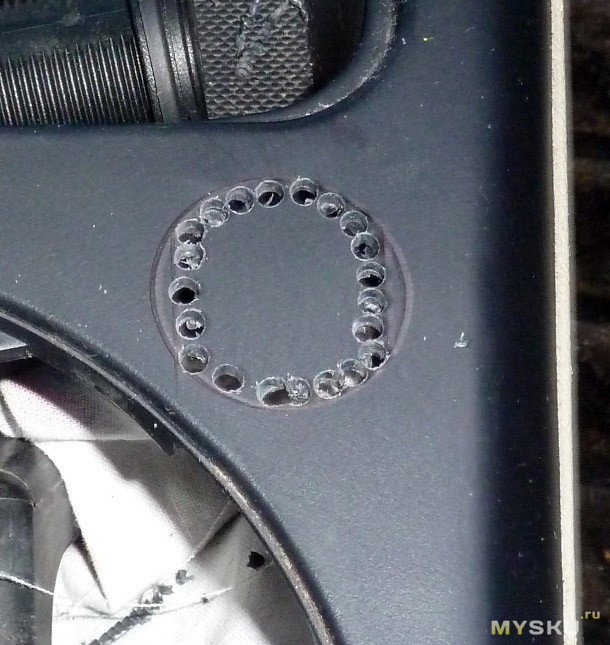

Подровнял полукруглым напильником, вычистил опилки пылесосом, мешающую изнутри пластмассу срезал ножом (на фото ещё не срезана)
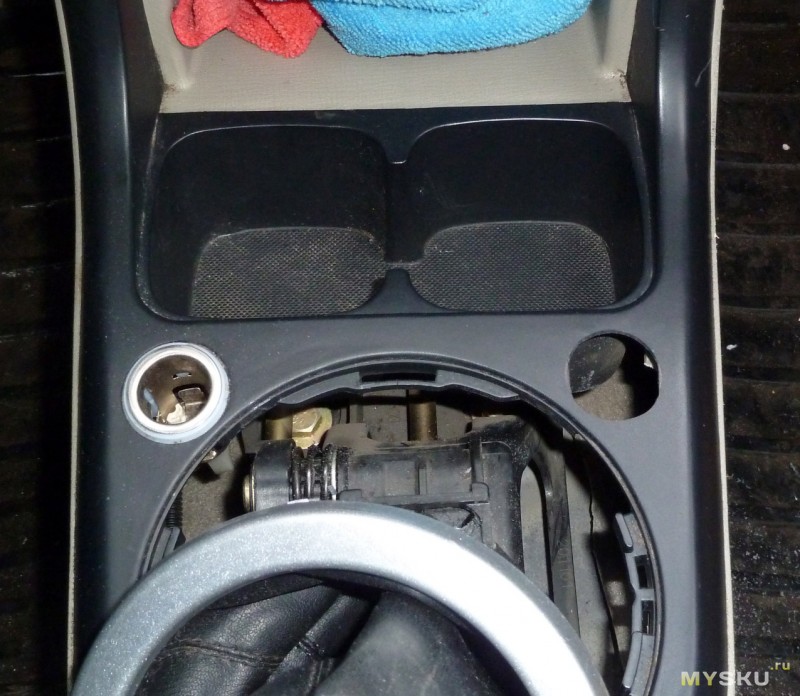
Поставил, затянул гайку
Подключил параллельно штатному гнезду прикуривателя
Обычно соединения паяю, но тут токи небольшие и банальная скрутка работает нормально
Православная синяя изолента отказалась липнуть на холоде, пришлось мотать буржуйской

И зажгутовал
В нужных местах закрепил стяжками
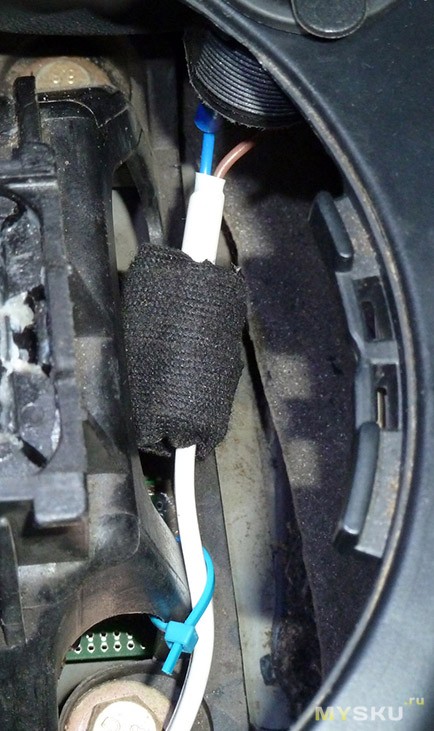
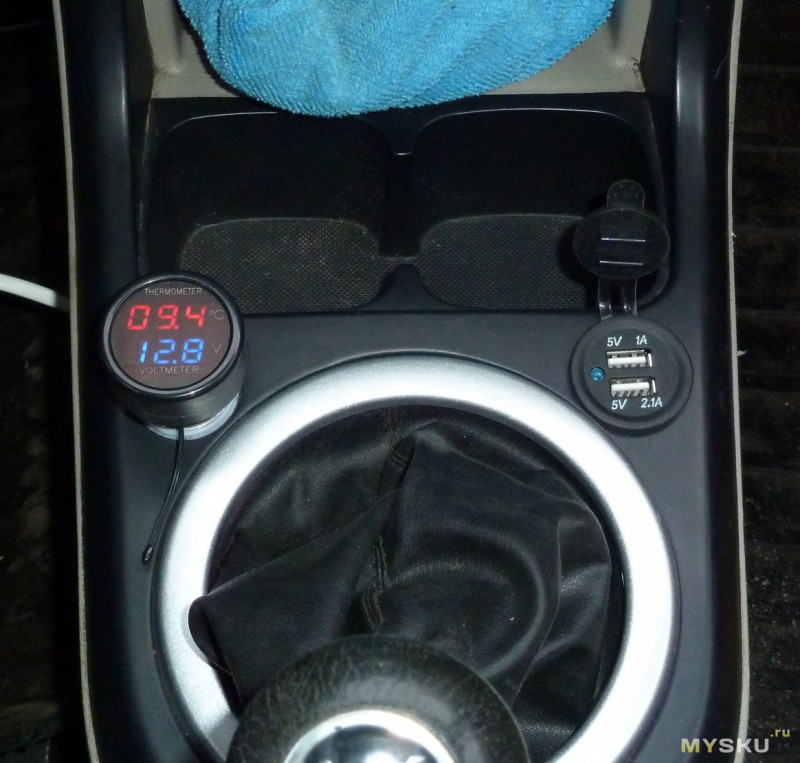
Готово
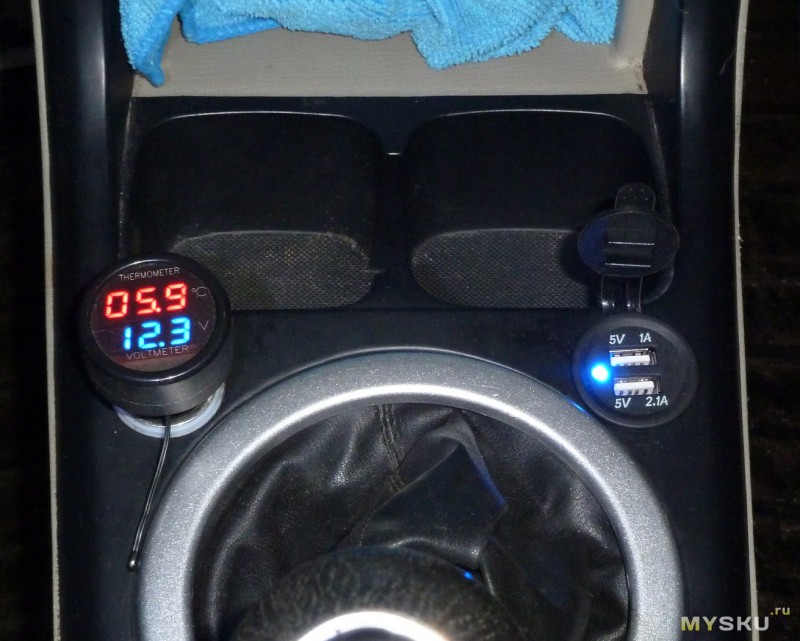
На всё ушло 2 часа
Если что-то не понятно — спрашивайте.
Достоинства: внешний вид и качество изготовления, неплохой КПД, честные 2,1А.
Недостатки описаны в статье.

Цена 200 ₽ руб.
Мини-USB зарядное устройство 2,4 А 12 В для мотоцикла, авто, грузовика, квадроцикла, лодки, автомобиля, автобуса, водонепроницаемый адаптер питания, розетка для всех телефонов
 4.6 / 69

The 12V socket in your car was designed for heating up a cigarette lighter, and it found new life as a receptacle for 12-volt accessories. But if you’re absolutely certain that you’ll never want to use your cigarette lighter as a cigarette lighter, or even as a 12V socket, then you can actually use that space for a brand new purpose: to house a dedicated USB port.
Before you go down that road, it’s important to consider all of your options first. Since car cigarette lighters are also universal 12V sockets that can be used to power anything from a cell phone to a tire pump, you may be giving up more than you gain, even if you aren’t using the socket right now.
Cigarette Lighters and 12-Volt Sockets
While it is true that the accessory sockets found in virtually all modern cars and trucks started out as cigarette lighters, they’re increasingly used for other purposes. In fact, some cars ship without the cigarette lighter portion at all and instead include some type of safety plug. Other vehicles include a single cigarette lighter socket and then several 12V accessory sockets that won’t even accept cigarette lighters.
The inclination to ditch your cigarette lighter, in light of the fact that you don’t smoke and won’t allow smoking in your car, is definitely understandable. But first, it’s important to note that a cigarette lighter socket can power a lot of different types of devices, which is functionality that you’ll lose if you replace it with something like USB.
For instance, a typical cigarette lighter circuit is capable of providing enough amperage to power devices like phones and tablets, via a USB charger. You can also plug in a wireless Qi charging mat if your phone supports it.
Beyond that basic use, you can also plug in higher amperage devices like a 12V tire pump, many of which are designed to draw little enough amperage that they won’t blow a cigarette lighter fuse. You can also plug in a cigarette lighter inverter and power other electronics, provided they don’t draw too much amperage. Other accessories, like car air ionizers and purifiers, can also be plugged into your cigarette lighter.
Replacing a Cigarette Lighter With USB
The easiest way to replace a cigarette lighter with USB is to just toss the lighter portion and plug in a low profile 12V USB adapter. Some 12V USB chargers are big and bulky, but there are a number of options that fit more or less flush with the dash and come in a variety of colors to better match the trim.
The adapter option will leave your cigarette lighter in place as a 12V accessory socket, just in case you ever want to plug in a tire pump or anything else that can’t be powered by USB. Done correctly, it will also result in a clean installation that gives the visual impression that you have ditched your cigarette lighter in favor of a high tech USB port.
The other option is to remove the cigarette lighter socket and install a USB port in its place. This is also a totally viable option, and there are a ton of aftermarket options out there. Some provide two USB ports in the same space occupied by the old cigarette lighter, while others include other functionality.
Replacing a cigarette lighter socket with a 12V USB port is a relatively simple operation, but you may have problems with fit and finish. Although more or less direct replacements do exist, you may have to cut into your dash a little or do some finishing work to make everything look clean once you’re done.
Wiring a 12V USB port in place of a cigarette lighter socket is a simple matter, once you’ve found one that will fit in your car. The cigarette lighter socket will have positive and negative leads, which you’ll have to disconnect from the socket and reconnect to the USB port.
Depending on the way the socket is wired in, and the terminals built into the USB port, there may be some cutting and soldering of wires and terminals involved.
Here’s what the basic process of replacing a cigarette lighter socket with a USB port looks like:
-
Remove the cigarette lighter fuse to avoid shorting the circuit while you work.
-
Remove any dash trim components that block access to the portion of the cigarette lighter that is concealed behind the dash.
In some cases, you can gain access to the cigarette lighter by removing a vent, drawer, ashtray, or another dash component, and rarely have to remove the console that the cigarette lighter is installed in. Try accessing the cigarette lighter from under the dash if you’re having trouble.
-
Remove the electrical connections from the cigarette lighter.
If the cigarette lighter has a light, you can usually remove it by twisting the base counter-clockwise. The power and ground wires usually clip on and may or may not be contained in a single plug.
-
With the wires off, use your fingers to remove the nut that holds the socket in place. If it’s too tight, use a wrench or socket.
-
Remove the sheath from the lighter.
-
The cigarette lighter will now pull through the front of the dash.
-
Insert your new USB port through from the front of the dash.
-
Connect your USB port to the power and ground, being careful not to reverse the connection.
Solder the wires together, or use crimp connectors. Don’t twist and tape.
-
Secure the USB port in place. This is typically done with a nut on the back.
-
Replace the cigarette lighter fuse, and test the USB port.
-
If the USB port works, replace any trim components that you removed to gain access to the cigarette lighter, and you’re done.
Limitations of Replacing a Cigarette Lighter With USB
If you decide to remove your cigarette lighter and wire in a new accessory like a USB charger, it’s important to remember that the new accessory will have the same limitations as the original socket. Since you will most likely end up using the existing power and ground wires, the new USB accessory won’t be able to pull any more current than the original cigarette lighter socket without blowing a fuse.
It’s also important to note that while you can replace a cigarette lighter with USB, you can’t just wire a USB port into the existing cigarette lighter power leads and call it good. USB is designed to provide 5V DC, while your vehicle’s electrical system provides somewhere in the neighborhood of 12V — 14V. Accessories that are designed to replace a cigarette lighter with one or more USB ports include internal circuitry that allows them to provide the correct voltage to your phone and other electronics.
Exploring Other Cigarette Lighter USB Options
Directly replacing a cigarette lighter with a hard-wired USB port accessory is a great option if you’re looking for a really clean, OEM-type look without any messy wires. However, leaving the cigarette lighter socket in place and installing a flush mount USB charger opens up a lot of other options down the road.
Most hard-wired 12V USB accessories that are designed to replace a cigarette lighter socket only provide a single USB port, or two at the most. Similarly, most low-profile USB chargers that you’ll find only provide a single USB port. This is fine if you’re the only one in the car, but if you ever want to provide power to one or more passengers, it could end up problematic.
By leaving the socket in place, and using a low-profile USB charger for a clean look, you leave open the option of pulling the low-profile charger and plugging in a multi-tap should the situation ever call for it.
Some cigarette lighter socket multi-tap devices provide four or more 12V accessory sockets, in addition to USB ports, which can push right up against the amperage capabilities of the cigarette lighter socket while providing power to all of your passengers simultaneously. These devices don’t look as clean as a low-profile charger, or a hard-wired USB accessory, but you can always stash them away under the seat or in the glove compartment when not in use.
Another option is to replace the cigarette lighter with a pass-through device that hooks into your head unit. This type of device doesn’t connect to the preexisting wiring from a cigarette lighter, so that will have to be safely snipped and taped to prevent a short.
Instead, this type of device will include a USB port and a 3.5mm aux port on the front, and cables on the back that you can plug into your head unit—provided your head unit has auxiliary inputs and a USB connection on the back. This essentially provides an auxiliary input and USB connection conveniently located in your dash or center console without having to cut any additional holes.
Cigarette Lighters Versus USB Power
Regardless of the way that you decide to go with your cigarette lighter socket, either working around it or totally replacing it, you’ll definitely get a lot of use out of USB on the road. Most portable devices today can be powered by USB, and it’s also increasingly found in head units as a way to transfer data from phones and MP3 players.
Leaving the cigarette lighter socket in place may provide more options today, but USB probably has more legs in the long run. With smoking out of vogue, ashtrays have been disappearing from cars and trucks since 1994, and cigarette lighter sockets could very well be the next on the chopping block.
Thanks for letting us know!
Get the Latest Tech News Delivered Every Day
Subscribe
С помощью данного USB-устройства, вы сможете заряжать свой телефон, не покидая салона автомобиля. Особенно это удобно и актуально в поездках на длительные расстояния и если вам нужно быть на связи 24/7.
Прикуриватель оснащен двумя USB-разъемами, что одновременно позволяет заряжать два устройства. Также на блоке есть светодиодный дисплей, который показывает уровень напряжения.
Обращаем ваше внимание на то, что в комплекте не идут кабели для зарядки мобильных устройств.
❗Доставка товара USB зарядное устройство вместо прикуривателя с вольтметром по всей России: Москва, Санкт-Петербург, Новосибирск, Екатеринбург, Казань, Нижний Новгород и
любые другие города
Челябинск, Самара, Омск, Ростов-на-Дону, Уфа, Красноярск, Воронеж, Пермь, Волгоград, Краснодар, Саратов, Тюмень, Тольятти, Ижевск, Барнаул, Ульяновск, Иркутск, Хабаровск, Махачкала, Ярославль, Владивосток, Оренбург, Томск, Кемерово, Новокузнецк, Рязань, Набережные Челны, Астрахань, Киров, Пенза, Севастополь, Балашиха, Липецк